Physical Address
304 North Cardinal St.
Dorchester Center, MA 02124
Physical Address
304 North Cardinal St.
Dorchester Center, MA 02124
Scroll through your social media feed today and you will notice a massive shift. People are tired of looking at generic, computer generated graphics. In 2025, every brand started using text to image tools to create impossible landscapes and glossy product shots. It worked for a few months. Now, audiences scroll right past them. They crave real human connection.
For social media creators, your face is your brand. You cannot rely on abstract graphics to build a loyal community. This is why the smartest creators have pivoted away from typing prompts into an empty box. Instead, they are using image to image workflows. They start with their actual photos and apply intelligent edits over them.
AI photo editing saves you hours of manual clicking in traditional software programs. It handles the tedious tasks like removing messy backgrounds or fixing terrible lighting in seconds. The goal is no longer to create something entirely fake. The new goal is to elevate your existing personal brand while maintaining your unique, recognizable identity.
You do not need to learn a dozen different software tools to stand out online. You just need to master a few specific aesthetic strategies that resonate with modern audiences. Here are the three most effective ways to upgrade your visuals.
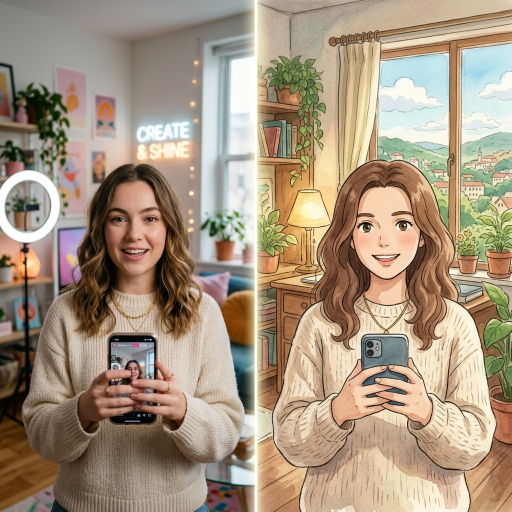
The Storytelling Avatar Sometimes a standard selfie does not capture the mood of the story you want to tell. Audiences love nostalgia and strong artistic themes. By applying a specific filter, you can turn an ordinary photo into a character from a movie. For example, using Ghibli-style portraits for your YouTube thumbnails or Instagram carousels instantly grabs attention. It adds a warm, cinematic quality to your posts that stops people from scrolling.
The Professional Upgrade Not every post requires a heavy artistic theme. Sometimes you just need to look highly professional, but you do not have the budget for a studio photographer. You can use an AI portrait generator to instantly upgrade a casual smartphone selfie. The software can automatically adjust the lighting, smooth out distracting shadows, and blur the background to create a crisp, LinkedIn ready headshot.
The Consistent Aesthetic Filter The best creator accounts have a recognizable visual vibe. Their photos all share a similar color grading or mood. You can train these new editing tools to understand your specific style. Once the software learns your preference, you can batch edit dozens of photos at once. This ensures your entire grid looks cohesive and intentional, rather than a random collection of snapshots.
We must address the elephant in the room. The biggest fear creators have is looking fake. If your audience feels like they are looking at a plastic mannequin, you will lose their trust. In 2026, consumer data shows that people put a massive premium on human authenticity.
You must avoid the uncanny valley. This happens when you push the editing sliders to the absolute maximum. The software smooths out every single pore, removes your natural asymmetrical features, and makes your eyes look glassy. You want to use these tools to enhance the mood, not to erase your humanity.
Transparency builds trust. You do not need to announce every time you use a tool to fix the lighting or remove a trash can from the background. But if you completely change the artistic style of your photo, you should tell your audience. People actually enjoy seeing the creative process. Sharing the “before and after” of your heavily stylized portraits can actually increase your engagement.
You need a reliable system that works every single time. Do not just upload a random photo and hope for the best. Follow this exact workflow to get professional results without losing your authentic edge.
Step One Start with a High Quality Base The software is powerful, but it cannot perform miracles. If you upload a blurry photo taken in a dark room, the final result will look muddy and confused. Always start with a photo that has even lighting and a clear view of your face. Stand near a window so the natural light fills in any harsh shadows.
Step Two Define the Platform Goal Different platforms require different visual strategies. A YouTube thumbnail needs high contrast and bright colors to stand out on a crowded screen. In this case, a heavily stylized anime filter works perfectly. However, a Substack header or a professional media kit needs a softer, more grounded look. Choose your editing intensity based on where the photo will live.
Step Three Apply and Dial Back This is the golden rule of modern photo editing. Professionals call it the 80 percent rule. First, apply your chosen filter or effect at full strength to see what the software can do. Then, grab the opacity or intensity slider and pull it back. If you reduce the AI effect just a little bit, your natural skin texture and real facial expressions will bleed back into the image. This keeps the photo grounded in reality.
The creator economy is moving faster than ever. Those who refuse to adapt will spend hours doing manual tasks that their competitors finish in seconds. But those who rely entirely on heavy automation will lose the emotional connection with their audience.
Mastering these tools now will separate the true professionals from the amateurs. The winning strategy in 2026 is using intelligent software to support your human creativity, rather than trying to replace it.
You should take action today. Take a standard selfie right now. Run it through a professional portrait enhancer, and then try a heavy cinematic filter. Post the results side by side on your social media feed and ask your audience which one they prefer. You will learn exactly what visual style drives the most engagement for your specific brand.